
E Pluribus Unum Magnum Cepa
Tor, or The Onion Router, is the software equivalent of an iron clad shield to the 1st amendment to the Constitution of the United States of America. It protects user anonymity and privacy, allows a user to access hidden, deeply secure, and secretive parts of the internet, and allows website owners to operate under a shroud of untraceable anonymity and discretion. In my last post I briefly explored some of the virtues of Tor, explained the technical principle behind it, and described how to install the Tor software and access the Tor network, taking advantage of its anonymity granting powers. This post will describe how to give back to the Tor project by strengthening the Tor network.
Tor lives as a network of volunteer routing nodes, or relays, which run the Tor software. When you run the Tor browser you are relying on these volunteer relay operators, benefiting from the processing power and bandwidth that they provide for free as your network path hops from node to node. The more relay servers are made available, the stronger, faster, and more reliable the Onion becomes. This post explains how to set up your own relay server so that if you have some little bit of extra bandwidth, and a reliable enough machine to run it on, then you, too can become a part of the Onion, adding to it’s scope and effectiveness. If you really want to give back, one solution is to get a discount VPS and run your relay server from there, so that your home bandwidth is not effected. I have had great luck with LetBox VPS, and currently have a running relay server set up at shush.unfettered.net that only costs me a few dollars a month.
Installing Tor
Before we can contribute to the Tor network we obviously have to install the Tor software. My last post briefly covered installing the Tor bundle, and went through the steps to install the Tor software on Ubuntu Linux. If you installed via one of those two methods, you already have everything that you need to run a relay server and give back to Tor. In brief, here are the steps to install Tor in Ubuntu:
Create the file /etc/apt/sources.list.d/tor with the following text
deb http://deb.torproject.org/torproject.org xenial main
deb-src http://deb.torproject.org/torproject.org xenial main
Get the Tor security keys
$ gpg —keyserver keys.gnupg.net —recv 886DDD89
$ gpg –export A3C4F0F979CAA22CDBA8F512EE8CBC9E886DDD89 | sudo apt-key add –
Install the Tor proxy and relay monitoring application with one line in the terminal:
$ sudo apt-get update && sudo apt-get install tor deb.torproject.org-keyring tor-arm
Notice in that last step that the application tor-arm was installed. This was not installed with my last post, so you might want to install that now, on its own.
Configuring the Tor relay: Deeper into torrc
The Tor configuration file is found at /etc/tor/torrc in Ubuntu, and needs to be opened with root privileges. If you are using the Tor browser bundle in Windows or Mac OS, torrc can be accessed via the advanced settings tab in your browser. Here’s an example of a torrc file already set up to run a relay server at your.url.info
As you can see, the torrc file explains itself pretty well.
Here’s a quick rundown of some general settings that have been altered. These are not strictly required for running a relay, but can be useful.
- Line 20: “SocksPort 0”
- Optional: This will turn off the client proxy services.
- Do this if you are running a dedicated relay.
- Do not do this if you are intending on connecting to Tor through your browser.
- Optional: This will turn off the client proxy services.
- Line 39: “Log notice file /var/log/tor/notices.log”
- Optional: logging has been enabled. Handy for troubleshooting.
- Line 50: “RunAsDaemon 1”
- Optional (Tor defaults to this) Tell Tor to run as a background service.
- Line 54: “DataDirectory /var/lib/tor”
- Optional: Overrides the default, tells tor where to store the relay server data.
Now we’re ready to head down to the final section of this file, set up our relay server, and fine tune it for our needs.
- Line 84: “ORPort 9001“
- Critical: This turns on the relay server; Tells Tor what port to use and advertise over
- Line 94: “Address your.url.info”
- Important: To be a part of the network, Tor needs either an IP address or an URL.
- Leaving this blank will cause Tor to try and guess your location.
- Important: To be a part of the network, Tor needs either an IP address or an URL.
- Line 101: “Nickname FancyNickname”
- Important: A nickname worth remembering…
These next few options are for enabling and adjusting bandwidth limits:
- Lines 109 & 110: “RelayBandwidthRate 512 KBytes”, “RelayBandwidthBurst 768 KBytes”
- Optional: Limit the amount of bandwidth that is available to Tor at any given moment.
- Line 118: “AccountingMax 40 GBytes”
- Optional: The amount up upload/download traffic to allow in a specified amount of time
- the 40 GBytes will be 40G up, and 40G down, for a total of 80 GBytes
- Optional: The amount up upload/download traffic to allow in a specified amount of time
- Line 120: “AccountingStart day 00:00”
- Optional: When to reset the traffic limit. Here it resets every day at midnight.
These next few options are nice extras that you can set to be a good Tor citizen…
- Line 131: “ContactInfo Tor Bot: <tor-bot@your.url.info>”
- Optional: A way for folks to contact you in regards to your relay
- Line 137: “DirPort 9030”
- Optional: Earn good karma and set this option if you have the spare bandwidth to reflect network directory information to the Tor network.
- This will help distribute the “map” of the known Tor relays amongst clients and other relay peers.
- Optional: Earn good karma and set this option if you have the spare bandwidth to reflect network directory information to the Tor network.
- Line 148: “DirPortFrontPage /usr/share/doc/tor/tor-exit-notice.html”
- Optional, Very Uefull: This can be set to any static html file which will be served up to anybody visiting your relay with a web browser.
- Think, “Disclaimer”
- Optional, Very Uefull: This can be set to any static html file which will be served up to anybody visiting your relay with a web browser.
- Line 157: “#MyFamily $keyid,$keyid,…”
- Optional: Leave this commented out. If you run more than 1 relay you identify your relays here to keep them from being used in the same set of hops for any given client.
Tor is always in need of willing exit relays. Use with caution.
- Line 191: “ExitRelay 1”
- Optional: RISK: Setting this option to 1 turns your relay into a Tor exit node. Your IP address will be the IP address that Tor client users appear to have. Use at your own risk, and make sure you have a disclaimer up if you do.
- Line 192: “ExitPolicy accept *:*”
- Optional: Required if ExitRelay is set. This list’s the traffic types that you do and do not permit. The above example permits everything.
After adjusting those to suit your needs, you’ll have a Tor relay set up and ready to go. Tor just needs to be restarted for the settings to take effect.
$ sudo service tor restart
Important: Look in /var/lib/tor and you should see some new files. In particular we want to pay attention to the “keys” folder, and the “fingerprint” file. Back these up! The Tor project keeps track of its relays, and ranks them. If you need to move your relay these files will help you maintain your relay stats.
Finally, open up a terminal and type
$ sudo arm
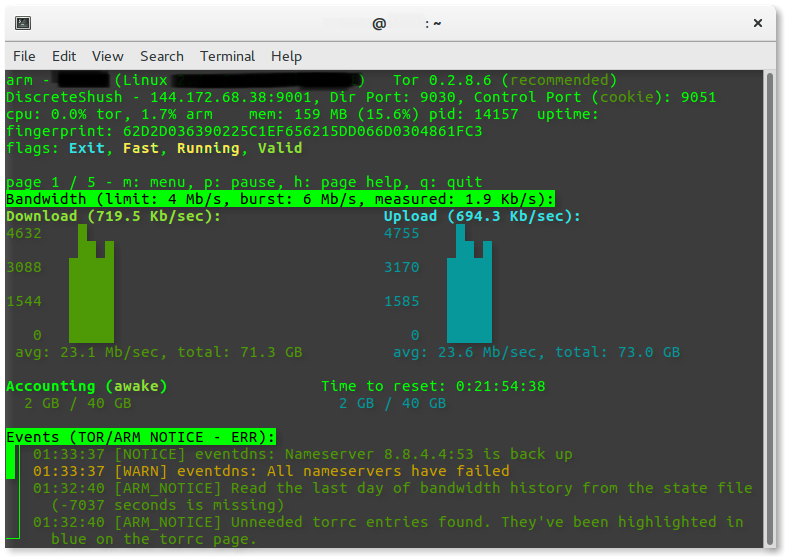
If everything went well you will see something like this, the tor-arm monitoring program. You can use it to do such things as keep track of how much data your serving up, and check the general status of your relay server. Also, after a few hours you can go to the Tor Atlas and do a quick search to see how your relay is doing, and remember to come back in time to see the stats build up and check out how you stack up against other relays in the network.
Conratulations!

Barring any erros, you’ve just succsessfully installed a Tor relay server, and are now contributing to the excellent Tor network! Keep an eye on that log file, and on the system log itself, if you encountered any problems.
To recap, you just
- Installed the Tor core software
- Modified a few lines in the torrc configuration file
- Restarted Tor for the changes to take effect
- Opened up the Tor monitoring software
Good job, and thanks for reading.