What is it good for?
A whistleblower, journalist, or blogger in a hostile environment, a hostage or victim of human trafficking; those dominated, vulnerable, marginalized, propagandized, and all those generally in need of a way to speak out or seek out, to cry out maybe for the sake of their very lives… all of these folks need the same critical thing: a voice. They all need a way to have a voice that is safe, secure and discrete, trusted and confidential. They need a way to reach out and speak out that leaves no trace, and reveals no characteristic.
On the internet everything that you do is ticked and tucked away, targeted for tracking and ongoing identification for the surface purpose of such benign ideals as targeted advertisement in the name of robust and free trade practices. However these tracking practices, together with the digital footprints that we leave behind, can be used for nefarious purposes as well. Hostile governments can hack, track, silence and censor their citizenry, cyber-criminals may track and then hack your identity and resources; vital information such as science or current events may be kept from you, keeping you a prisoner of ignorance and propaganda; or maybe you just get yourself and all of your friends and families targeted by aggressive spammers.
It is easy to see that there are many ways that we need discretion in our online lives. We need a cryptographic security to protect our freedoms and privileges of free speech, open research, access to research, free exchange of information, and choice. Meet Tor  The onion router, which provides a one stop solution for all of those needs. Tor liberates online communication, for good or ill, and equips us to lead a more confident and, for all of Tor’s discretion, open online lives. A champion against censorship and overbearing authority, Tor is a champion of free speech.
Of course, as much as Tor enables discrete, secure communication, it enables ANY such communication regardless of intent, legality, or moral value, opening the door for all varieties of dubious services, offers, and communications. Tor connects the malignant as well as the benign with the same efficient precision. It is this author’s opinion that what Tor provides for far outweighs the baggage that comes with it. Even with the unhindered trafficking of all manner of controlled substances, we can infer clear benefit, such as a reduction in violent crime due to the shift in the nature of the transaction. This is a complicated topic that I don’t currently intend to definitively solve, or even explore.
This is the first in a small series of posts exploring how to use the Tor network. This post explores what Tor is, takes a brief look at how it works, and explains how to get connected to it. Later, we’ll learn how to strengthen the Tor network by becoming a part of it, and then we’ll finish by exploring how to set up secure, discrete services and destinations within it. This post will explore a few of the tools available to connect to the Tor network, explaining how to set them up and make the most out of them.

So… what exactly IS Tor?
Tor is an anonymity routing network with no central server, router, or authority, which functions as a collaborative and cooperative network of volunteer nodes, all operating according to specific cryptographic algorithms, and unique protocols of confidentiality and identity validation. The Tor software acts as a local socks proxy, which enables it to get around most data blockades and censorship walls, but it differs in that it connects directly to an entrance node into the Tor network instead of some static server. From that secure, encrypted entrance point, your data enters a multi-layer hop, going into the onion, making a discrete hop, and then hoping back out again, scrubbing off all traces of where it came from. The folks at the Tor Project explain the whole process rather well.
In short, when you enter the network, the entrance node only knows where you’re coming from and that you have some Tor encrypted data. The next hop only knows that you have some data, and the final hop, or the exit node, only knows where you’re going to. Furthermore, if you are connecting to a site that is secure with https, not even the exit node knows anything about the data that is being passed. The Electric Frontier Foundation has set up a nice interactive map that helps to explain how that happens,
Ok, how do you use it?
Getting connected to the Tor network is as easy as downloading and installing a new browser. If that’s all that you want to do, and you don’t want or need to dig any further, then you’re good right there. That link has all of the downloads n ecessary for various Linux distributions, Mac OS, and Microsoft Windows for a browser that is built with Tor under the hood. The Tor browser bundle features a version of the open source browser Firefox, modified with security in mind, and configured to connect to a Tor proxy that is installed along side of it. With the bundle, everything is set up and ready to go. The Onion Router Project writes the underlying proxy code, does the Firefox modifications, and makes it available for everybody to review, making it open to all sorts of scrutiny, and freely available for anybody to download and use.
In this post, we will put Tor on your computer and integrate it into your every day browser to enable fast, discrete switching between regular browsing and Tor browsing. This will be done on Ubuntu Linux 16.04.1, using the fully open source version of Chrome, the Chromium browser, but the process is essentially the same for whatever OS and browser that you are using. We simply want to get to the Tor proxy protocol and use our own browser instead of theirs.
Step 1: Installing Tor in Ubuntu 16.04
Give Ubuntu the location of the latest code right from the folks at The Tor Project by saving the following to a new file at /etc/apt/sources.list.d/tor
deb http://deb.torproject.org/torproject.org xenial main
deb-src http://deb.torproject.org/torproject.org xenial main
Tell Ubuntu how to establish trust when connecting to those locations with specific keys. In a terminal:
$ gpg --keyserver keys.gnupg.net --recv 886DDD89
$ gpg --export A3C4F0F979CAA22CDBA8F512EE8CBC9E886DDD89 | sudo apt-key add -
Install the Tor proxy with one line in the terminal:
$ sudo apt-get update && sudo apt-get install tor deb.torproject.org-keyring
Ubuntu is ready to use the Tor network using default Tor settings. Before that happens, get familiar with the central Tor configuration file, torrc, which is where these defaults live.
Meet the Tor configuration file: torrc
You need root, or administrative privileges, so open the file up like so:
$ sudo gedit /etc/tor/torrc
This file is divided up into three sections. The first section contains the general settings, and the following two sections are for configuring hidden services, and setting up a Tor node, or relay. Around line 15 should be something like this:
## Tor opens a SOCKS proxy on port 9050 by default — even if you don’t
## configure one below. Set “SOCKSPort 0” if you plan to run Tor only
## as a relay, and not make any local application connections yourself.
#SOCKSPort 9050 # Default: Bind to localhost:9050 for local connections.
#SOCKSPort 192.168.0.1:9100 # Bind to this address:port too.
Here we see that Tor opens a socks proxy up on the localhost connection at port 9050 by default. In this section we could hide our proxy a bit and bind Tor to the loopback ip of 127.0.0.2, or something similar, or change the port to something like 4242. To do that add the following line to the end of this section:
SOCKSPort 127.0.0.2:4242
Save the file and reload the Tor settings for that to take effect:
$ sudo service tor restart
![]() Note: If you installed the tor browser you can get to the torrc file pretty easily by going into the advanced settings like so:
Note: If you installed the tor browser you can get to the torrc file pretty easily by going into the advanced settings like so:
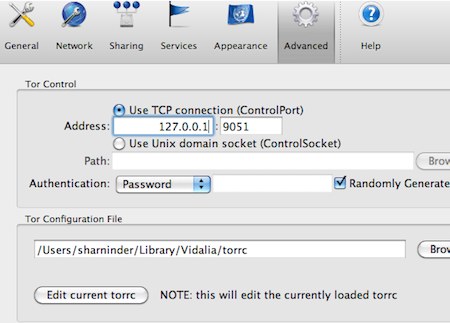
Step 2: Configuring the browser
First get into some of Chromium’s native security settings. There’s plenty of good how to “harden” Chrome articles, here we’re just going to reduce tracking:
- Go into settings
- Click on the “show advanced settings” link at the bottom of that page
- Find the Security section
- Make sure that the “Do not track” option is selected
Have a look around some of these other settings and get familiar with them, adjust them to suit your needs. To make tracking even more difficult, install the WebRTC Network Limiter extension, and to further the security cause install the EFF’s excellent HTTPS Everywhere extension to help make sure that Chromium is making secure connections whenever possible.
There are plenty of great extensions out there for the purpose of managing custom proxy servers, one of these is the VPN.S HTTP Proxy extension for Chrome. During installation you will be asked if you want to download a list of default proxy servers from VPN.S, you do not, we are going to make our own in the options page which looks like this:
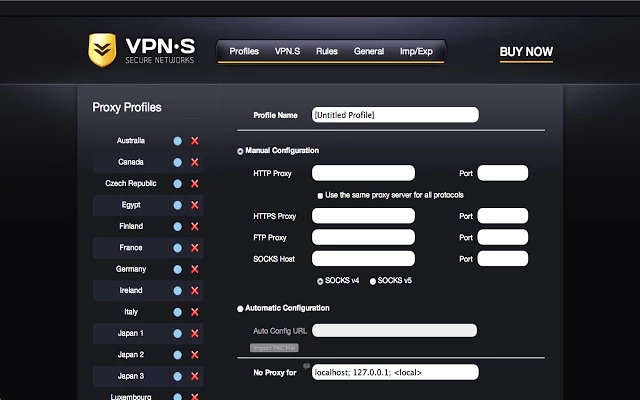
The setup is very straightforward.
- Give your proxy profile a discrete name
- Fill in the SOCKS Host box with the loopback ip address of 127.0.0.1, or if you changed it, to 127.0.0.2
- Fill in the Port box, 9050 by default, or use whatever port you have set, like 4242
- Select SOCKS v5
- Save your profile and return to the main screen in Chromium
You should see a grey shield icon in your toolbar, click on it and select the proxy profile that you just set up. When the shield turns gold you’re connected and using the Tor network, make sure to verify this by going here.
Finally, right-click on your little shield icon, and click on “Hide in Chromium Menu” to watch that little shield vanish before your eyes. To find it again, click on the 3 little buttons that you use to access your settings. Now you can discretely switch between Tor browsing and regular browsing with the click of a hidden button in your regular, every day browser.
Of course, since Tor acts as a SOCKS proxy, we can use it to tunnel any sort of traffic. The Tor Project has a fairly comprehensive set of instructions to help you Torrify just about any sort of application and avoide common pitfalls. You may want to Torrify an instant messaging, IRC, or email application. Here, we’re going to look at one more way to make use of your Tor proxy in Ubuntu
Step 3: Optionally proxy your entire internet connection
In Ubuntu, go into the Settings menu and click on the Network icon. Click on the network proxy settings tab and set up your Manual proxy with the same settings as before:
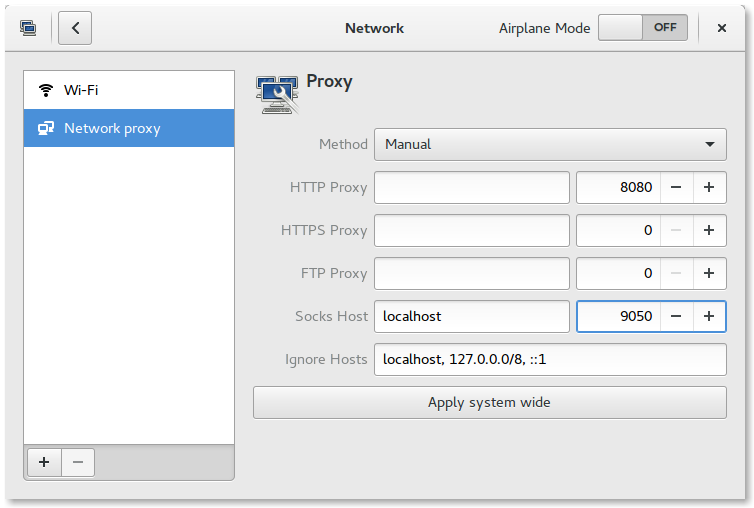
Optionally, you can enter the following in a terminal:
$ gsettings set org.gnome.system.proxy.socks host 'localhost′
$ gsettings set org.gnome.system.proxy.socks port 9050
$ gsettings set org.gnome.system.proxy mode 'manual'
To revert those settings and switch your system back to normal:
$ gsettings set org.gnome.system.proxy mode 'none'
Gnome Extension Proxy Management
If you are using the Gnome Desktop environment then you can install and turn on desktop extensions from the Gnome Extensions website, one of these extensions will help us to easily toggle our new system proxy. First, we have to install a helper for Chromium from the folks at Gnome. We can do this with one command in the terminal:
$ sudo add-apt-repository ppa:ne0sight/chrome-gnome-shell && sudo apt-get update && sudo apt-get install chrome-gnome-shell
Restart Chromium and install the Gnome Shell Integration extension to get the Proxy Switcher for Gnome. Just click the “Off” slider button to “On”, and when asked say “Yes” that you want to install it. This puts a new menu option right on your desktop to discreetly toggle a system wide Tor proxy.
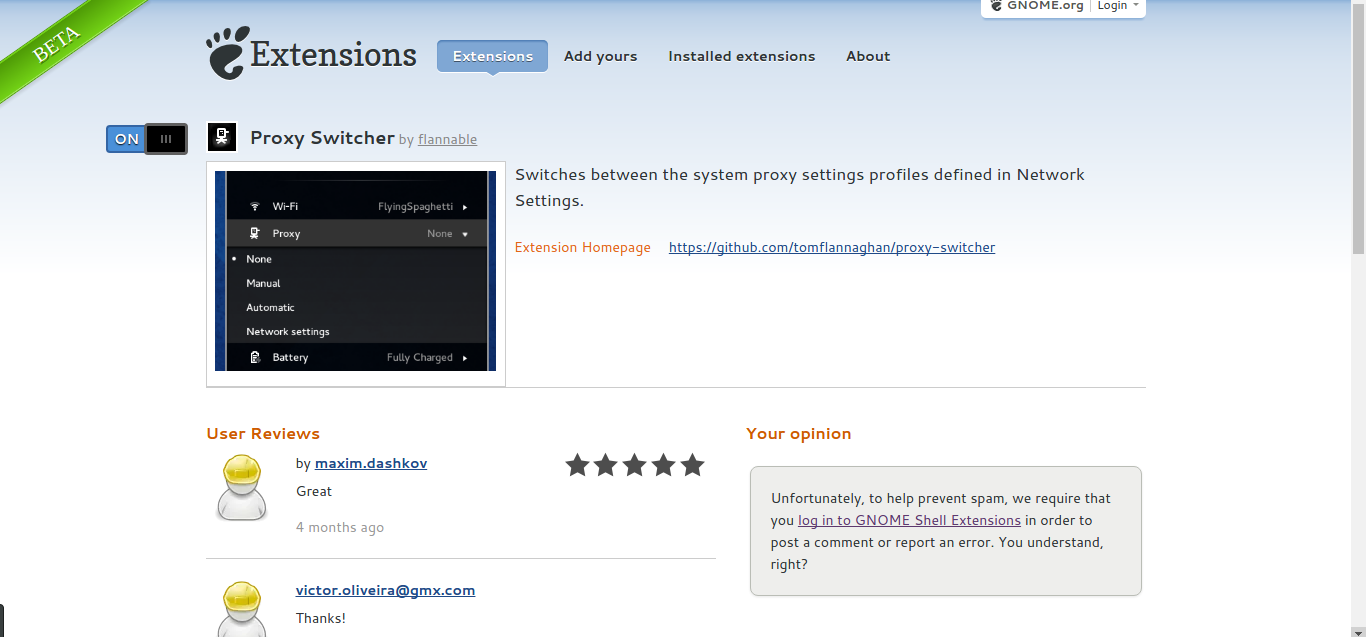
Congratulations, now you have discrete Tor connections integrated right into your desktop, and/or into your every day browser. Here’s for hoping that you’re never really in a situation where you need this kind of technology, but knowing that it’s there sure does add to our collective digital peace of mind.
Thanks for reading.

