Secure Your Internet Traffic on Ubuntu 14.04 with a SOCKS proxy
(it’s easier than you think!)

In this day and age, we use our computers for everything from banking and bills to searching for love, trolling our friends on social media sites, and even telling our deepest secrets to our most trusted allies. We trust our computers to handle all our most sensitive information, and so it is more important than ever that we do everything that we can to ensure the safety and security of our information and our connections.
This step-by-step instructional will show you how to easily set up a SOCKS4 or SOCKS5 proxy server, which will harden your internet connection and provide you with the peace of mind in knowing that your identity, finances, and private life, are all that much more safe and secure.
Just follow along, I did the homework so that you don’t have to.
Assumptions
This instructional makes a few basic assumptions, so let’s go over them here.
- Assumption one, you are running the latest Ubuntu, or a modern Linux distro on the client machine (your laptop, or whatever you use regularly). While this should work on Mac, I have not tested it, so I cannot make any promises.
- This can be done on a Windows machine using a program called Putty, more on that over here…
- Assumption two, you have access to your own VPS, or Virtual Private Server, and it is also running Ubuntu or a modern Linux distro.
- This is just your remote server, and you can get one rather inexpensively if you don’t already have one. You will want one that can handle a fair amount of traffic, I recommend LetBox, as they offer 5 Terabytes/month data transfer over a Gigabit uplink, and offer free DDOS protection.
- Select their OpenVZ 1024 plan and use the coupon code “MBOFF” for $2.50/month, or “YMBOFF” for $20/yr.
- Select their OpenVZ 2048 plan and use the coupon code “LETOFF” for $4.30/month, or “Y40” for $40/yr.
- After you get that set up, have a domain point at the server’s IP address, and your good to go. We’re assuming
server.com
- This is just your remote server, and you can get one rather inexpensively if you don’t already have one. You will want one that can handle a fair amount of traffic, I recommend LetBox, as they offer 5 Terabytes/month data transfer over a Gigabit uplink, and offer free DDOS protection.
Let’s Get To Work:
Setting up the SOCKS connection to the server
First of all, let’s save ourselves some time later on by setting up our number one networking and server admin tool, ssh, to be able to log on to our VPS without having to use a password.
Open a terminal and enter in these commands:
$ ssh-keygen
$ ssh-copy-id user@server.com
Enter in the password for your user at your server for the one and only time you will ever need to do that, again.
Next we need to go ahead and use ssh to connect to the server:
$ ssh user@server.com
And while we are here we need to edit the configuration file for the ssh service itself, and we need to do it with “root” or admin style privileges. This is easy with the program nano:
$ sudo nano /etc/ssh/sshd_config
And now that the file is open, we just need to add one line to the bottom of the file:
GatewayPorts yes
And then we have to save and close the file by pressing ctrl + x, and then restart the ssh daemons for the change we just made to take effect. This will kick us out of the server as well.
$ killall –HUP sshd
Now we are back on our local machine in our terminal. We only have one more command to go until we have our SOCKS proxy up and ready for us to use!
$ ssh -f -N -n -D localhost:1080 -R 12345:localhost:12345 user@server.com
That’s it!
No, really, that’s it! You now have a fully functional SOCKS5 (or SOCKS4) proxy server up and running ready for you to use. Any traffic that you put over it will be completely anonymous. People snooping your connection will ONLY see an ssh connection between you and your server, and that connection is encrypted very strongly. Your data will go out to the internet from your VPS server, which is NOT tied to your ISP, or your name, like your home connection is.
Before we connect a program to our server, let’s look at what we just did, and understand that command, option by option:
ssh- This clearly just calls the
sshprogram.
- This clearly just calls the
-f- This tells
sshto execute the command and go into daemon mode, or to run in the background. Without this option we would have to leave the terminal open the entire time we want to use the proxy. If that is what you want to do, a temporary proxy, then just leave the “-f” out and close your terminal when you’re done.
- This tells
-N- This tells
sshnot to execute any remote commands on server. Since we are leaving a remote tunnel open, this is pretty important, safety first and all that.
- This tells
-n- This is required whenever
sshruns as a daemon, or background service, so whenever we use “-f”, we should use “-n” as well. It prevents reading fromstdin, you don’t need to know what that does, just that it is important, so we need it here.
- This is required whenever
-D localhost:1080- This is the important one. This option essentially is the SOCKS server. It opens up a dynamic port on the machine it is executed on, and potentially binds to a network interface. So our command opens the dynamic port as 1080, and binds to the interface
localhostto begin listening for connections on port 1080. This makes it so that no other users on any other computers can connect to our SOCKS server, only thelocalhostitself… so… only the computer itself can use the service. We’re doing it this way because it is maximum security. We could, for instance, execute this command on our remote server, and omit the bindinglocalhostoption, that would open up the proxy to connections from any computer, on any interface… so it would be totally open. We could then use iptables to only allow our client machine to connect to the proxy server. There is a lot of flexibility here, be creative!
- This is the important one. This option essentially is the SOCKS server. It opens up a dynamic port on the machine it is executed on, and potentially binds to a network interface. So our command opens the dynamic port as 1080, and binds to the interface
-R 12345:localhost:12345This one is a little extra thrown in to show a little more flexibility. This option tellssshto open and then listen on a port, port 12345 in this case, on the remote server, and then forward all incoming connections on that port to ourlocalhoston the same port. This is not necessary for our basic SOCKS server, but more on what it can do further on.
user@server.com- This tells ssh what server to connect to, and what user name to use (notice you didn’t have to put in your password after the command?) Now the tunnel is open to our server, and the service is listening on our localhost connection, ready to send data over and out to the internet after it goes through our anonymizing proxy.
Making the connection start at boot
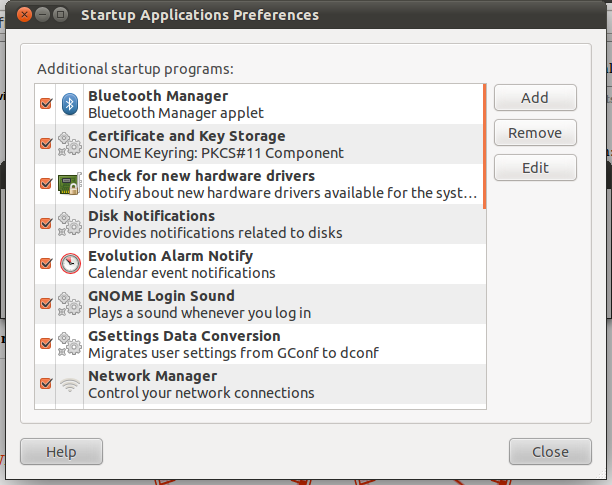
So now that we have set up a shared key login, edited the global ssh preferences on our server, and launched our SOCKS server, we want to make sure that the server starts when we log into our local client computer, right? In Ubuntu, this is easy. Just go and search Dash for “Startup Applications”, or just go to “Menu ⇒ System Tools ⇒ Preferences ⇒ Startup Applications” in a traditional Menu. You should get something that looks like this:
Click on the “Add” button and a second dialog box will open,
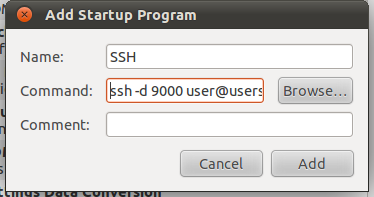
And in the “Command” test area, we add our command, but modify it by taking out the “-f”, which we only need when launching it in a terminal.
ssh -N -n -D localhost:1080 -R 12345:localhost:12345 user@server.com
Also remember to either change or omit the 12345:localhost:12345 to suit your needs, and replace user@server.com with your actual credentials. Use your own name, something like “SOCKS5 PROXY” and set the comment to remind you that it is “Running on localhost” in case you create other commands later for some other special requirements.
Setting the proxy system wide: using the connection
So now we have our proxy server starting at system startup, and for just a few extra bucks a month we have a rather robust and secure server. Let’s connect to it! In Ubuntu you can just go into the network settings and enter in a system wide proxy. We can do it in the terminal.
Firs of all we tell the system where the socks proxy is located:
$ gsettings set org.gnome.system.proxy.socks host 'localhost′
Next we have to tell the system what port to use for our socks proxy:
$ gsettings set org.gnome.system.proxy.socks port 1080
Next we have to tell the system that our proxy setting is now manually defined, not automatically:
$ gsettings set org.gnome.system.proxy mode 'manual'
And finally, if we want to revert these changes, and stop the system from using the proxy:
$ gsettings set org.gnome.system.proxy mode 'none'
But that doesn’t suit my needs. I don’t have to have all of my traffic go through a proxy. I might just want some of my web traffic to be routed through my proxy, so in Chrome I might install something like the VPN.S HTTP Proxy extension. I can just enter in my details in the options dialog, turn it on and off with a 1-click solution, and even tell ti which sites I want it to work with and what I want direct connection to. Neat!
Securing a specific app: Anonymizing BitTorrent traffick
But what about something a little more robust? How about BitTorrent? Let’s take a look at one more application of a secure SOCKS proxy.
To test this, we need a Bit Torrent application that supports proxy service, so we need to install Deluge. It works rather well with proxy, and is native to Ubuntu. Just:
$ sudo apt-get install deluge
Then set it up according to your preferences, which you can access those like so:
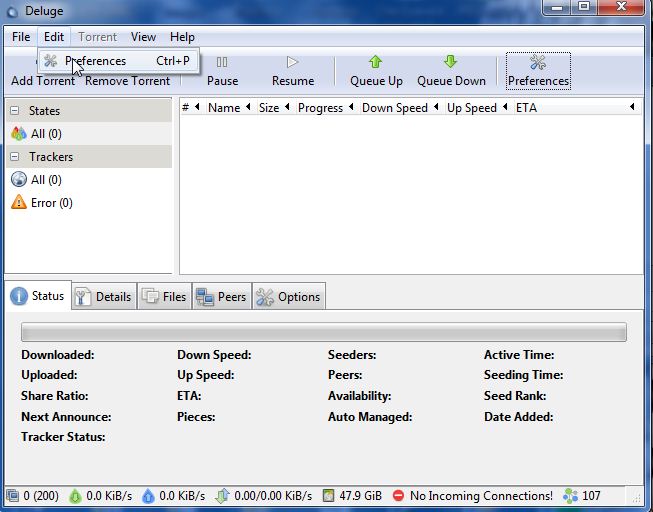
Next go to the Proxy settings in the preferences dialog:
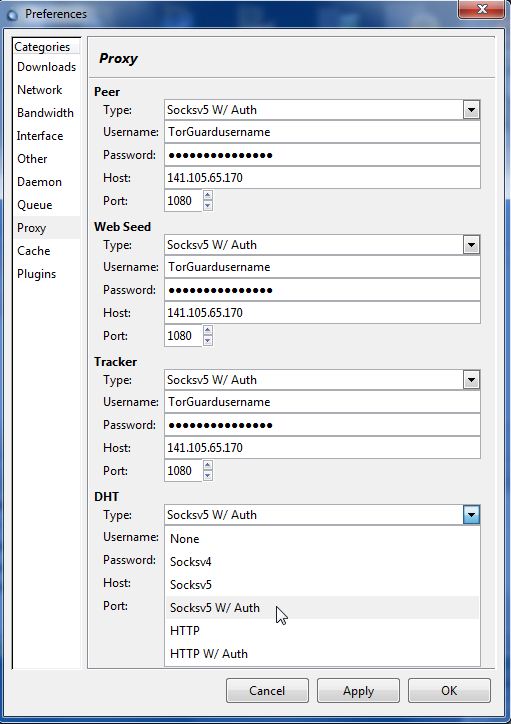
The above examples use “Socksv5 W/ Auth”, we want to chose “Socksv5” and use port 1080 for all four settings.
 Pro-Tip:
Even if you have DHT disabled, set this setting. If you use private trackers, and you don’t set ALL four of them, even with DHT disabled, your connection to your private tracker will fail.
Also, remember when we used port 12345? Yep, use that in “Network” as your port of choice. Now all of your Deluge data is over a handy Socks5 proxy, with bi-directional port forwarding over secure shell encryption. Does it get better? I’m sure it does, we could, for instance, configure another proxy after our server, perhaps a TOR proxy? It all depends on how security minded you are!
Special Notes: Deluge will continue to leak your IP address to a torrent swarm even after setting up a succsessfull SOCKS5 proxy, as per this bug. Luckily, there is a way to get around this. Simply install the latest version of the excellent ltconfig plugin for Deluge which allows you to manipulate libtorrent settign directly. After eneabling the plugin, just go to it’s config settings in the Preferences dialogue and find “anonymous mode” and “force proxy” and switch them both to “on” by ticking the box. Tick the box on the top of the dialogue to have these settings enabled at startup, “Apply” your settings, and restart Deluge. Presto.
Checking Our Work
Want to check that proxy out? For bit torrent you can try the ipMagnet tool, and for web browsing, perhaps the Open DNS diagnostic tool myIP? And while you’re there, why not check out switching over to Open DNS DNS servers? Since we’re talking security and privacy, it couldn’t hurt to stop polling your ISP’s DNS records, or even your VPS provider’s… every time you leave your Network Interface,  yeah?
yeah?
Good luck!