
Passwords, difficult to remember, difficult to remember to change, so much so that companies like Google, Mozilla, and Last Pass are always devising ways to help us keep track of them. Always subject to being hacked due to password weakness, insecure connections, or data breaches, they represent as much a security failure as they do a safeguard system. As an enthusiast with a home server, I want to be able to open that computer up to remote access, but I don’t want anyone able to get at the data due to something as banal as a password failure. As an admin and developer I have several projects and code that I don’t want exposed to the public, and I want another, more transparent and secure layer of security between my data and the world. As a service provider, I want to be able to both provide that same layer of security to my users, and also be able to know that the individual connecting really, really is my user, and not an intruder or imposter.
With the very real need for data and information security, and the very real shortcomings of the password system, we really need, at the least, something available to put in place to bolster up security in this information age. Fortunately, we do have some such thing. The technology has been around for some time, and is better than the password system in many ways. This system is called SSL, or more specifically Client Side SSL. My last post was an exploration of server side SSL using the trusted Certified Authority, or CA, Let’s Encrypt. This system uses the same basic technology, but is about identifying a client, not a server. As such, it involves installing a trusted, secure certificate on the client computer. A much better alternative than a password.
So, if it’s so much better, like I say, then why aren’t we using this? To put it briefly, because it currently involves opening up the intimidating Advanced Settings in your browser, going to the scary Security Settings, and opening up the very alien Certificates dialog. Gramma breaks the internet every other week as it is, no way is she going near that stuff. That’s why.
Sigh…
Moving forward, however, we should focus on this, and similar technologies to promote a better internet experience, something a bit more hassle free, with more secure data and less vulnerabilities in this information age. Setting up client side SSL is a lot easier than it might seem at first glance, and provides a great way to authenticate our users’ identities. Passwords no more…

Getting Started With Client Side SSL
Before we begin
This How To makes a few assumptions
- You are installing and working on an Ubuntu LTS or other modern Linux distribution
- You are using Apache as your webserver
- You are connecting over an SSH tunnel
- It might be time to consider setting up a key-based login for SSH, passwords no more here, as well.
In order to authenticate a user with a client side SSL certificate, before that certificate is installed in the user’s web browser, we need that certificate signed by a CA that is, itself installed on our server. So our task is to
- Create a Certificate Authority (CA)
- Sign a client side SSL certificate with that CA
- Install the CA on our server
- Install the SSL certificate in our web browser
Getting our tools out
In order to preform our tasks, we will be making use of the popular OpenSSL set of tools. OpenSSL is an industry standard set of encryption tools that, unfortunately, can be rather cryptic in and of itself and potentially presents a rather steep learning curve. We are going ot get around all of that by stepping out of the terminal and command line and into the realm of the GUI, or graphical user interface. To do that we are going to use a program called TinyCA. From their website, “TinyCA is a simple graphical userinterface written in Perl/Gtk to manage a small CA (Certification Authority). TinyCA works as a frontend for openssl.” As a front end for OpenSSL, all we have to do is install TinyCA, and the rest will fall into place behind it. To do this all we have to do is enter the following command into a terminal.
$ sudo apt-get install tinyca
With this, everything is all set. To launch the program, just enter the following into a terminal.
$ tinyca2
Creating our CA and issuing our certificate
The previous command will have opened the GUI for TinyCA, and opened up a dialog inviting you to create your first CA. Just fill in the fields to suit your needs.
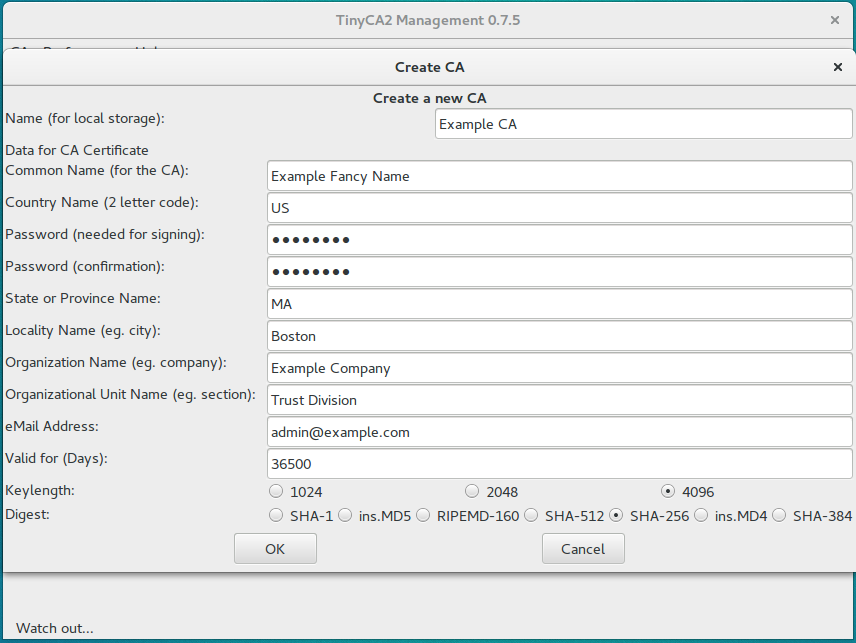
![]() Pro-tip: Set the “Valid for (Days) option to a Very High Number, set it, and forget it… but don’t forget the password to this CA, or the Common Name.
Pro-tip: Set the “Valid for (Days) option to a Very High Number, set it, and forget it… but don’t forget the password to this CA, or the Common Name.
Now we export the CA for later use, we will have to install it on whatever server will use this authentication scheme. Just click the little “Save” icon (the one on the left).
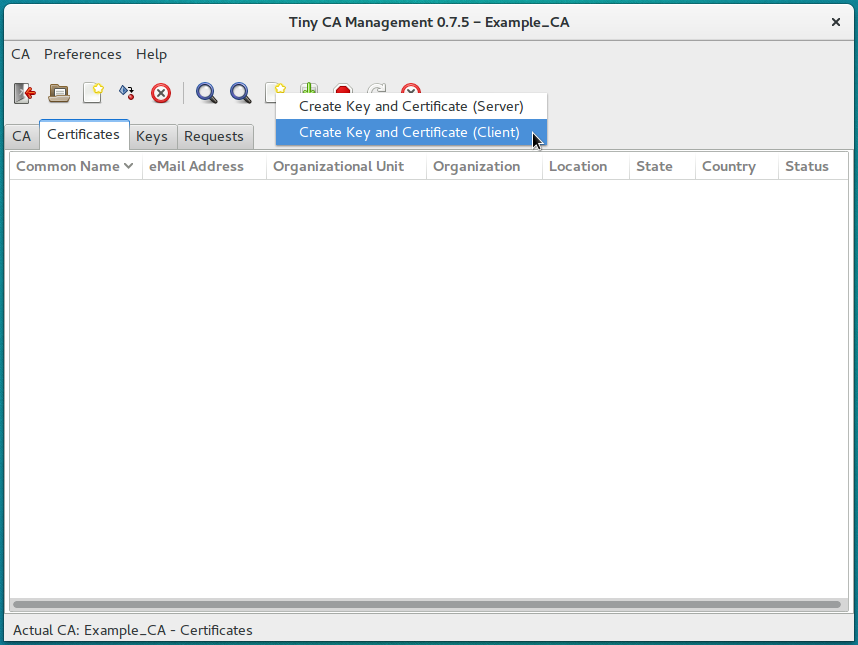
Next we have to issue the Client Certificate, just click on the “Certificates” tab and then the “New Certificate” icon, selecting “client”
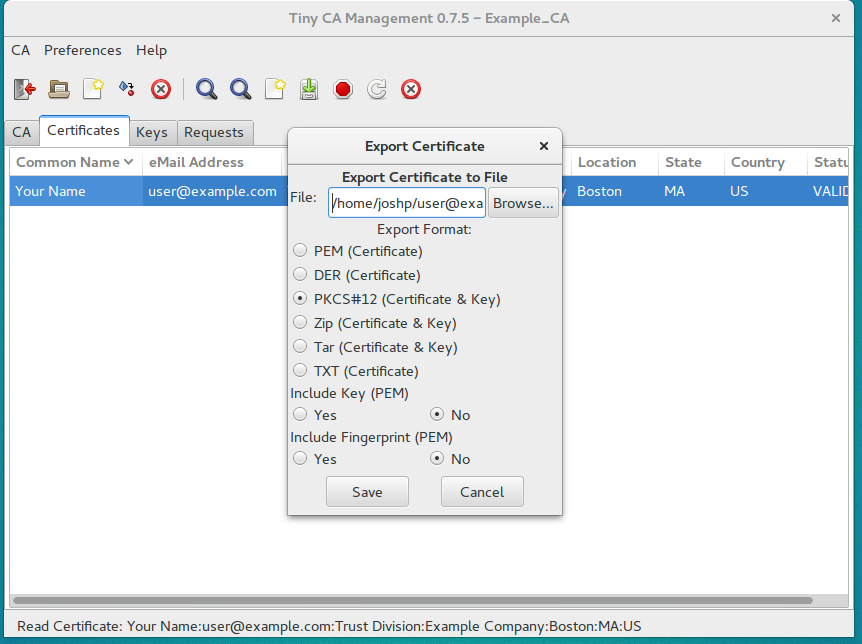
Here, just fill out the appropriate information for your user, as you did for the CA, remembering the same tips, and then export the certificate as a PKCS#12 file, remembering to use your passwords.
Congratulations, you have created a CA, and issued a self-signed client side SSL certificate. Easy as pie.
Installing the certificates
Installing the client side certificate 
This is the part that is the main reason this technology never gets used, but don’t worry, we’ll make it easy. We’re going to do this in Chrome/Chromium… but it is pretty much the same process in Firefox, Opera, and whatever other browser you might be using.
To begin, just open up your settings, and scroll down to the bottom where you see the “show advanced settings” option and click on it. Scroll down until you see “HTTPS/SSL” and click on the button. In the “Certificates Manager” dialog box that opens up, in the first tab, called “Your Certificates” just click on the “Import” button and browse to where you saved the p12 file, and there you go. Now you can click on the “View” button to see your certificate information. It should look something like this
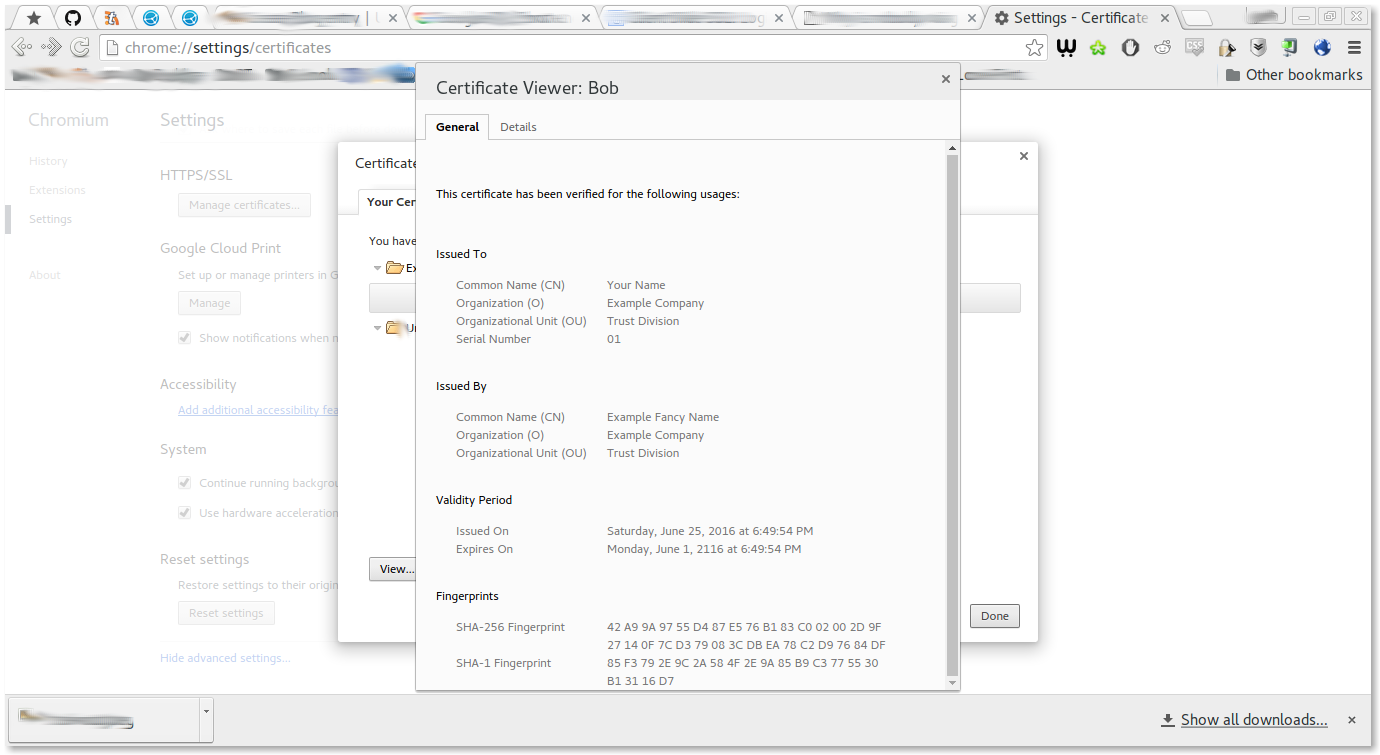
Congrats. You just conquered the alien settings.
Installing the CA and configuring the web server
The server needs to be able to use the CA to check validation against the client cert. This part is the easiest. First you need to copy the CA over to your webserver. To do this just execute the following command
$ scp Example_CA-cacert.pem your_username@example.com:/home/your_user_name/
Now open up your favorite text editor and open up the /etc/apache2/sites-available/000-default file on your server (or whatever virtual host file you need to edit) and simply add the following lines inside the virtual host in question
SSLEngine on
SSLVerifyClient require
SSLCACertificateFile /home/your_user_name/Example_CA-cacert.pem
SSLVerifyDepth 1
You can get more complex with this and set the SSLVerifyClient option to none, and then add in specific locations to secure like the following example
<Location /secure>
SSLVerifyClient require
SSLVerifyDepth 1</Location>
The more comfortable you get, the more you can explore the flexibility there.
After saving the file, restart apache with the following command
$ sudo service apache2 restart
Now go visit your example.com address and you will get a pop up asking for a certificate, if you do this with the browser that your certificate is installed in, it will ask you to select a certificate to use with this site. Make the right choice, and you’re in.
Success!

Congratulations, you have achieved ultra-paranoid level user authentication!
See that wasn’t so bad, was it?
One last tweak to make it even better…? Sure, why not.
BONUS: Automatic Certificate selection in Chrome/Chromium
In your client computer, let’s eliminate that annoying popup. This works (has been tested) for Chromium users in Linux. We will be adding the AutoSelectCertificateForUrls policy to Chrome.
Just create the file /etc/chromium-browser/policies/managed/cert-autoload.json
EDIT 9.22.2016 – A recent update made it necessary to change the location from what is in the above line to the following: /etc/chromium/policies/managed/cert-autoload.json
Just make sure to change “example.com” and other domains to suit your needs, and “YOUR_CA” to your actual CA common name that you made note of above, and you’re good to go.
One last ![]() Pro-Tip: if you’re using the “Location” option in your apache virtual host config file, just add in the domain or sub-domain those locations appear on, and all locations will work with one entry here.
Pro-Tip: if you’re using the “Location” option in your apache virtual host config file, just add in the domain or sub-domain those locations appear on, and all locations will work with one entry here.
Note: If you need to use the command line to generate your certificates, or need to look at Nginx, try having a look here.
Thanks for reading.